
PeopleSoft Workflow Implementation Using AWE for Coppin State University
Requirements
Coppin State uses customized PeopleSoft Requisition workflow for Requisition authorization at the University. PeopleSoft 9.2 delivers Approval Framework which can be leveraged along with new enhancements to replace the custom workflow authorizations.
The existing custom Requisition approval workflow was designed in PeopleSoft 84 version and has since been used without an upgrade to the solution. PeopleSoft 9.2 Approval Framework delivers features and enhancements which fulfil the gaps in the current custom version of the approval workflow.
Current State
>In the current approval workflow PeopleSoft 8.4 approval configuration was implemented using the Business Objects and virtual approval functionality. Customer uses three levels of approval:
- >Level 1 Approval – Cost Center Manager
- Level 2 Approval – IT Approval
- Level 3 Approval – Title III Fund Administrator
Issues to be Addressed
Currently the customer faces some issues, which are not addressed by the existing approval workflow:
- In a scenario where an approver is the same for all three levels, the approver has to approve the requisition transaction each time (three times in this case)
- Notifications are not sent to the Approvers or Requesters when a requisition is submitted for approval or finally approved/denied
- If there is an error in the approval workflow, the worklist transaction disappears without any trace and there is no notification to either the requester or the workflow administrator.
Final Requirements -Customer is interested in implementing the PeopleSoft 9.2 delivered Approval Framework for Requisition Approvals. This implementation will replace their existing custom Requisition Approval Workflow.
Some of the customer specific requirements are listed below:
- Disable Pushback functionality
- Rename the “Deny” button label to “Review” on the Approval pages
- Add a notification email to the Procurement Department on their Distribution List - Procurement @customer.com
- The requester should have access to “Multiple Approvers” panel to see who all have the request pending with
- Worklist Link should be renamed to contain Requisition ID only
- Users should not have access to the “Start New Path” Under the Approvals page
- Approval workflow should route the same way as current functionality:
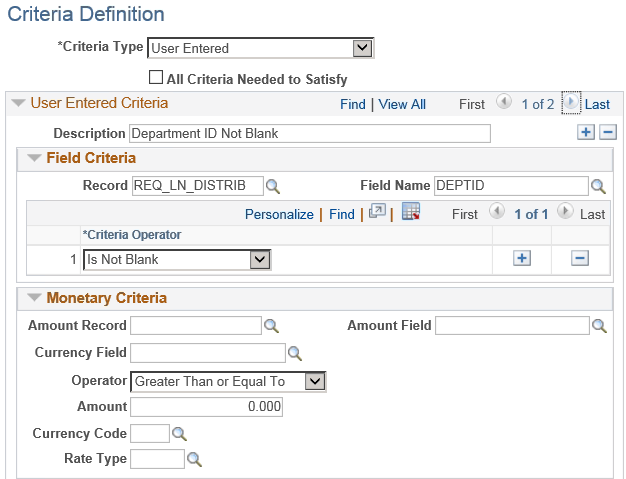
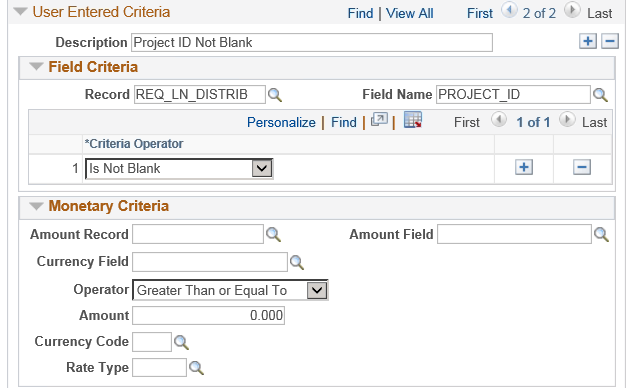
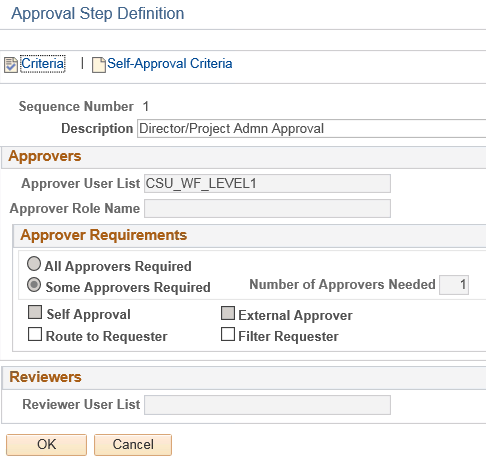
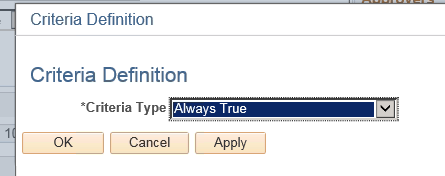
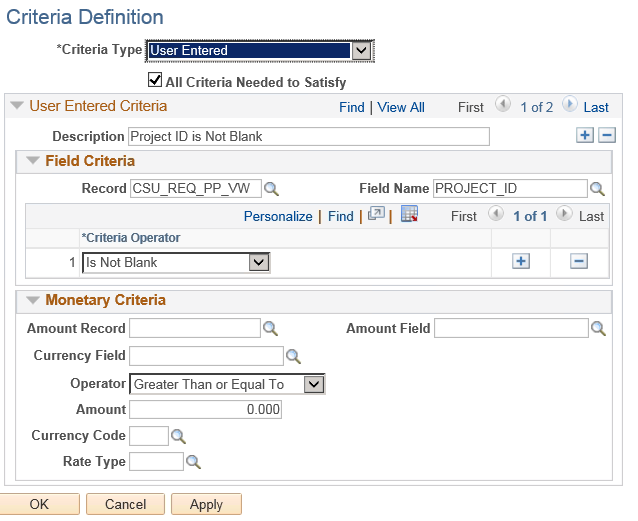
- Level 1 – Triggered Always – Department Managers or Project Admins
- Level 2 – Triggered with an OIT Account
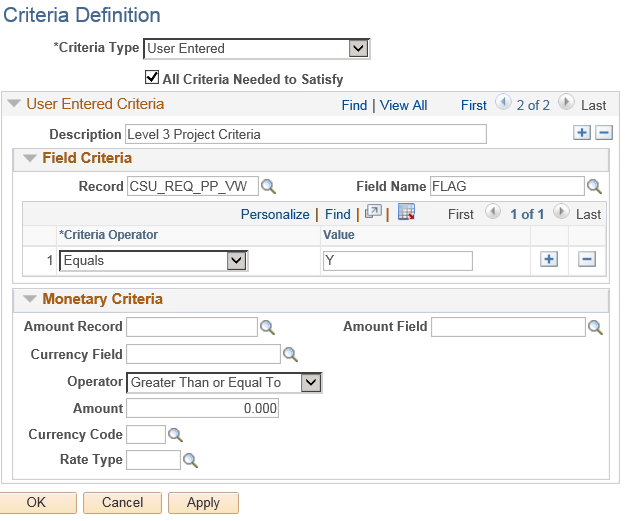
- Level 3 – Triggered with a Title 3 Project
Solution Details
PeopleSoft 9.2 Approval Framework is enabled at Coppin State University by disabling the Virtual Approval Framework for Requisition Approvals.
The approval setup is configured in the application as well as some features have been customized based on customer requirements using PeopleCode.
1. Activate Approval Framework
The first step in configuring the Requisition Approval Workflow is to disable Virtual Approval.
Activate Purchasing requisition workflow approval framework as below:
- Open the Purchasing Definition and go to “Req Change Options” tab
- Select the “Workflow Approval Required” Checkbox which will prompt you with a message to continue with disabling virtual approval, click “Yes”
2.Configure Transaction Registry
Review and update the Transaction Registry setup as shows in the snapshots below:
Navigate: Main Menu Enterprise Components Approvals Approvals Transaction Registry
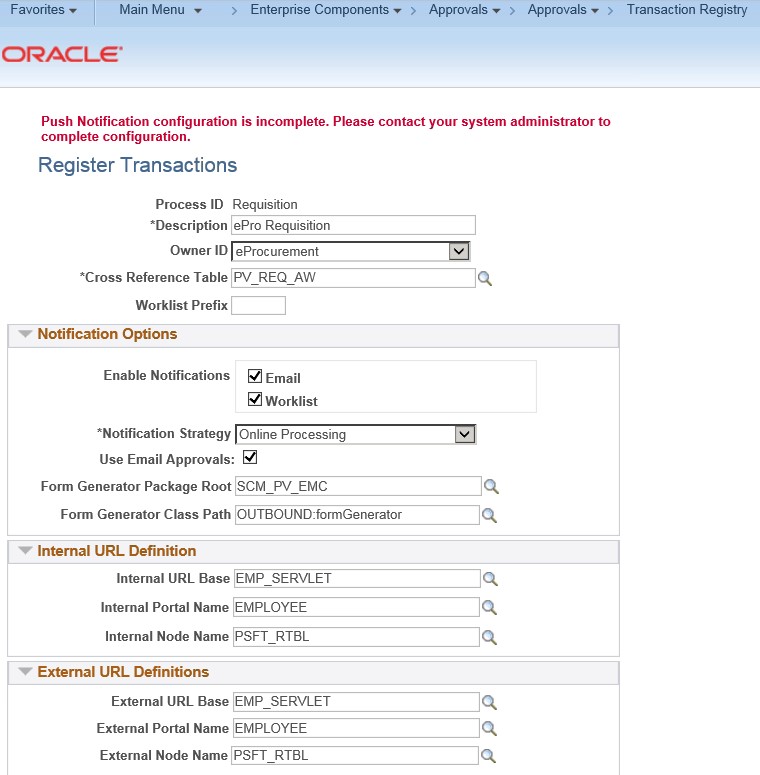
Review and update the Transaction Registry setup as shown below (continued):
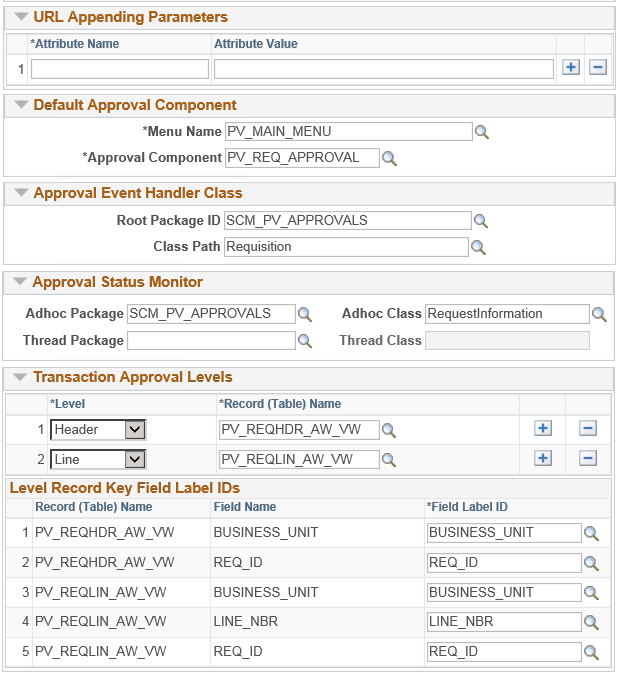
3. Transaction Configuration Setup
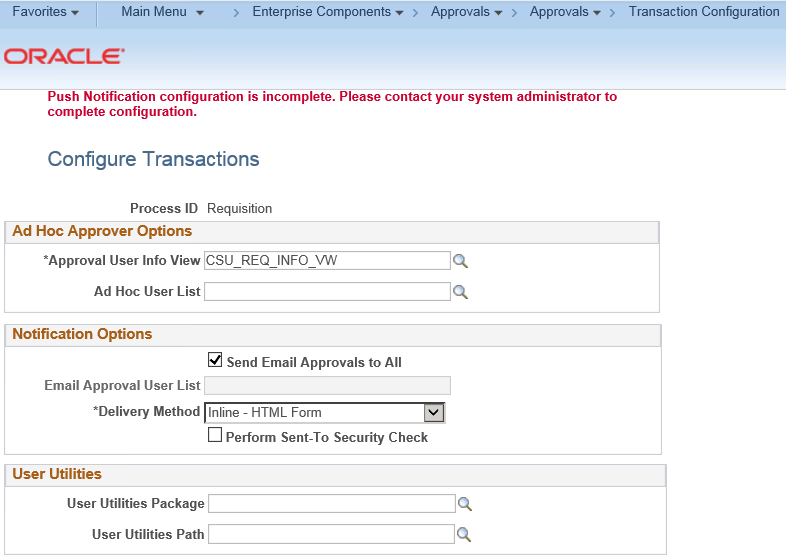
The Transaction Configuration setup is done manually. Below are the snapshots to review the setup after successful migration.
Navigate: Main Menu > Enterprise Components > Approvals > Approvals > Transaction Configuration
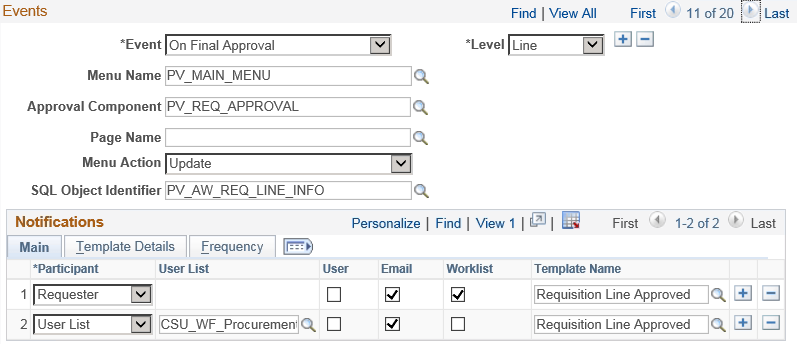
One of the Events is changed to add an Email ID once the Requisition is finally approved. This has been added as a User List (CSU_WF_Procurement) which uses a SQL Object defined in the Application Designer Project.
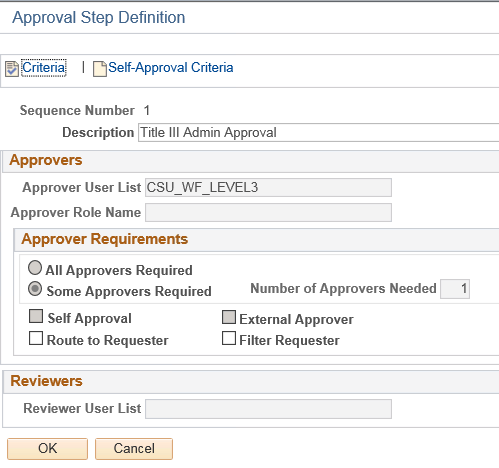
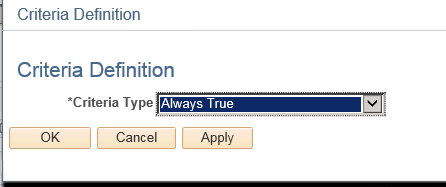
4. Approval Process Setup
The Approval Process Setup screenshots on how the setup should look like after completing the configuration.
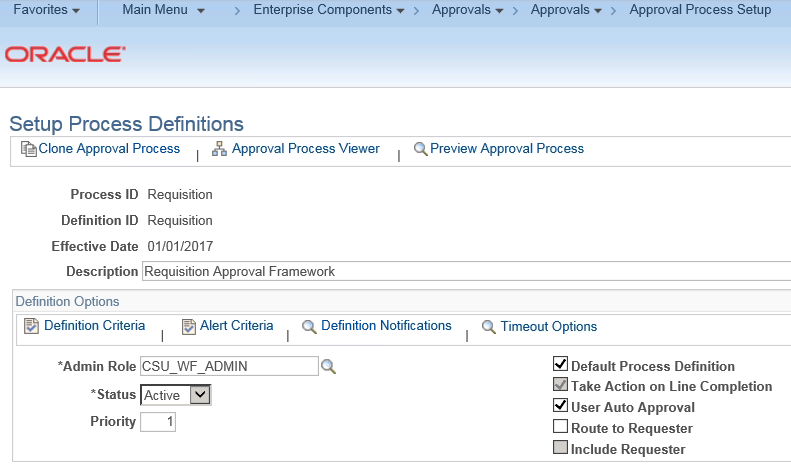
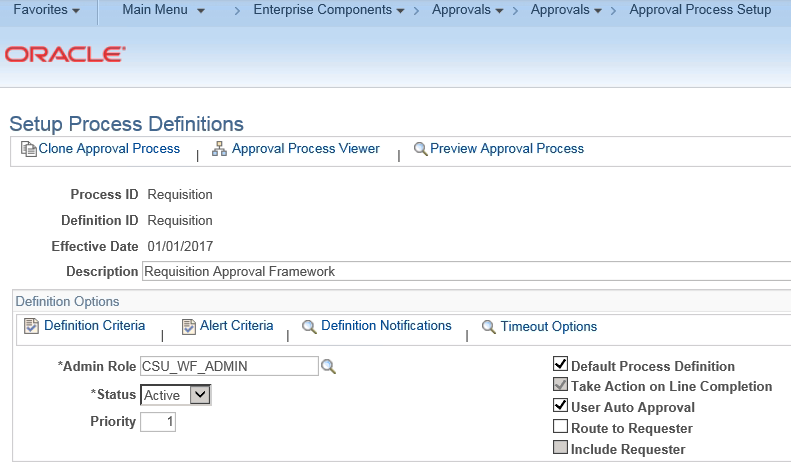
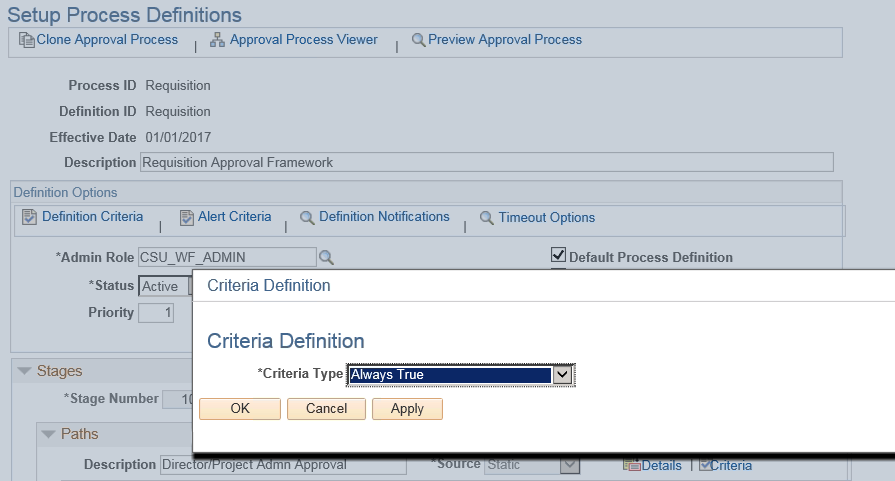
Step 1: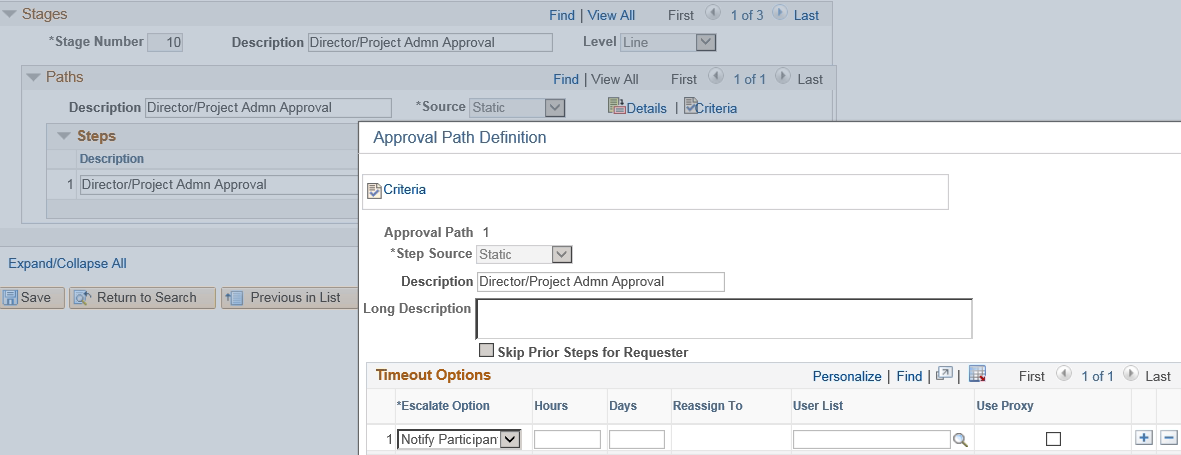


Step 2:
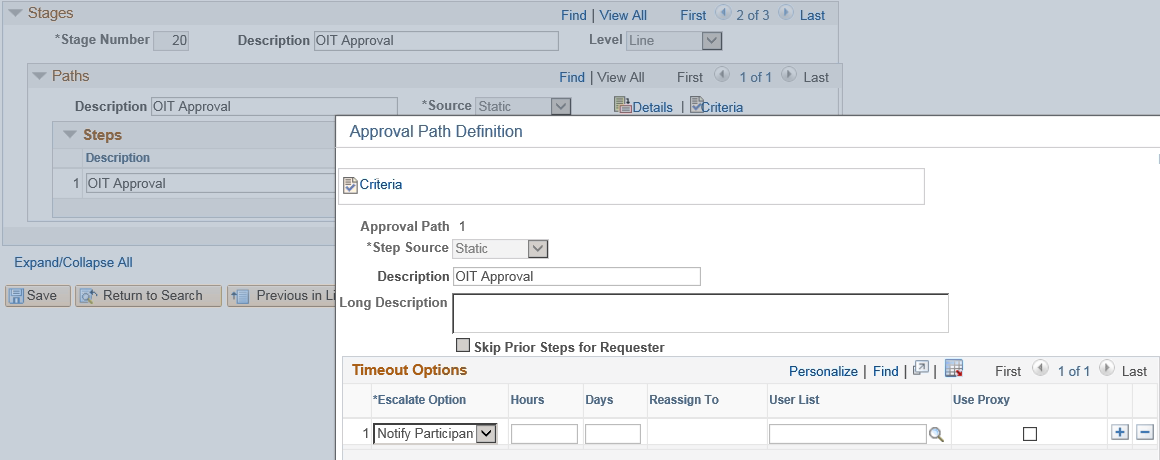
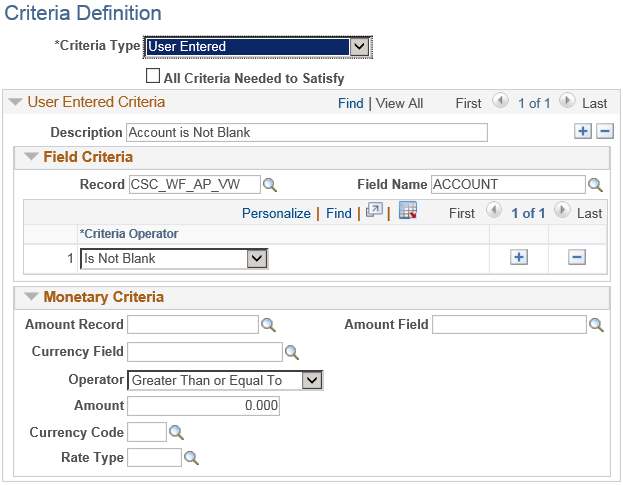

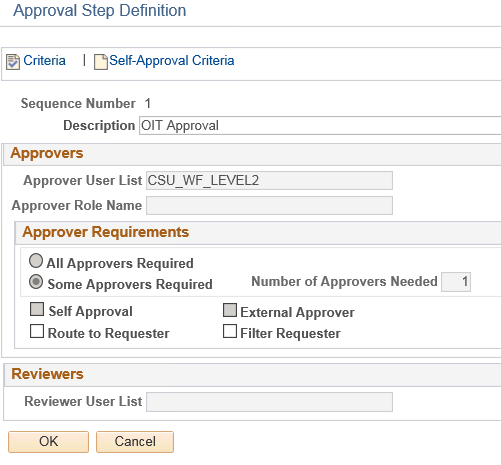
Step 3:
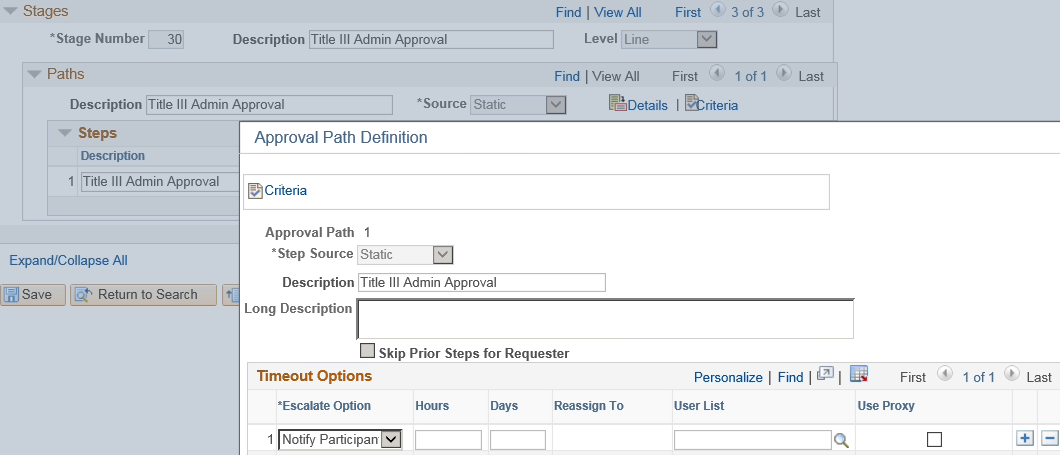


4. Configure URL Definition
To generate a URL in the email notifications to take approvers directly to the Requisition Approval/Denial page, URL definition is modified as shown below.
Please note that this definition changes based on environments. For example, the URL shown below is for TST environment and will be different for UAT or Production environments.
5. Integration Broker Setup
Please review the Integration Broker Setup as shown below:
NODES
Navigate: Main Menu PeopleTools Integration Broker Integration Setup Nodes
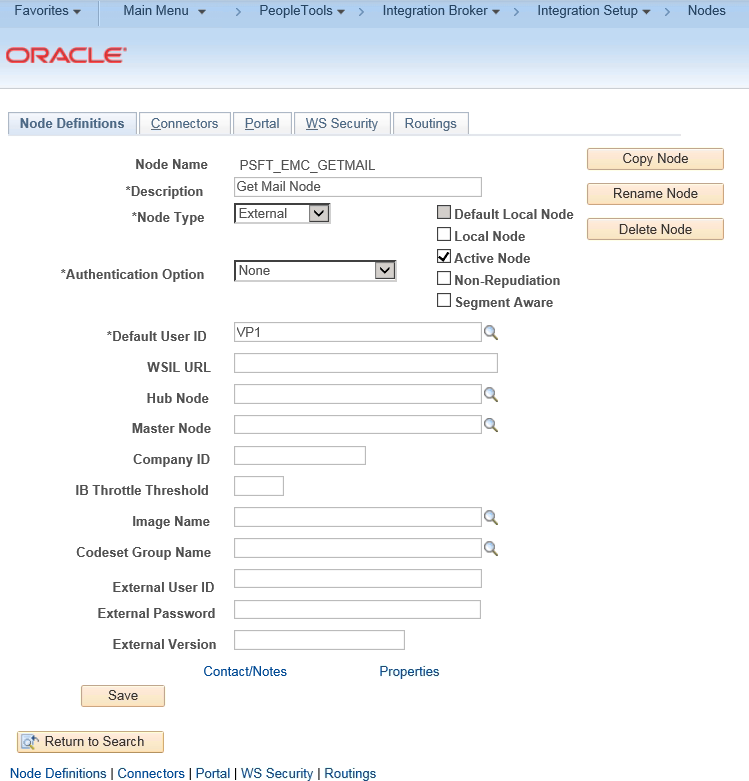
1. Open Node “PSFT_EMC_GETMAIL” and Make sure the Node is Active
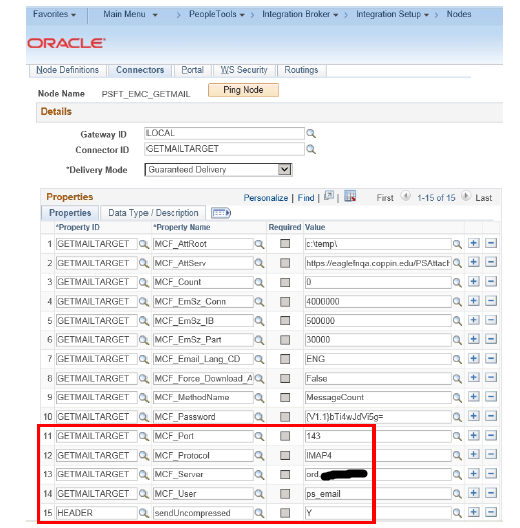
Under Connectors tab, make sure the highlighted properties are updated
Under Node Definitions tab, the properties should have the Property – EMC_REPOSITORY_EMAILADDRESS updated to “ps_email@customer.edu”
QUEUES
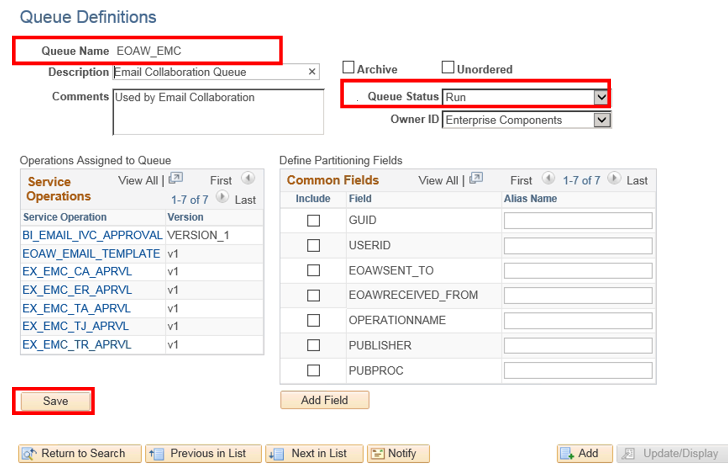
Navigate: Main Menu PeopleTools Integration Broker Integration Setup Queues
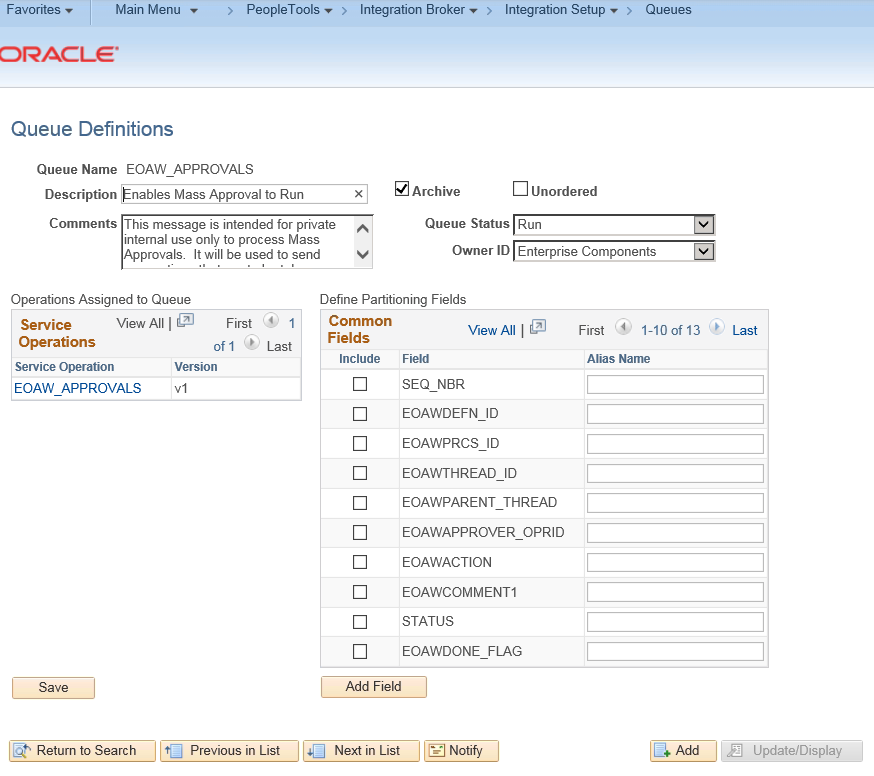
1. Open Queue “EOAW_APPROVALS”
2. Change the “Queue Status” from Pause to Run
3. Click on Save
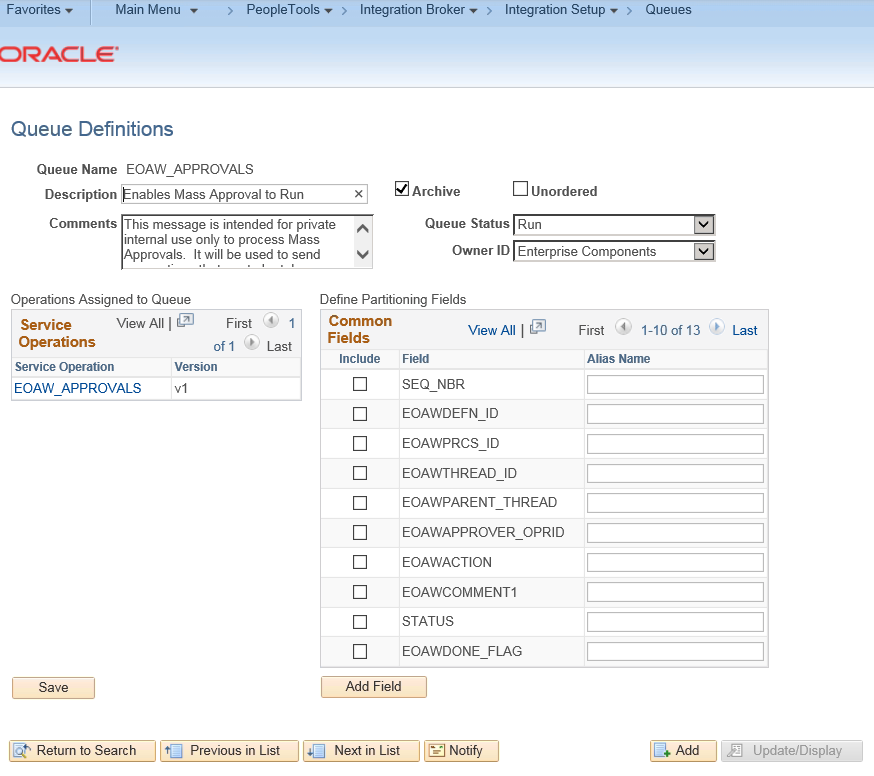
Click on the EOAW_APPROVALS Service Operation
Under General Tab, make sure the Service Operation is “Active”
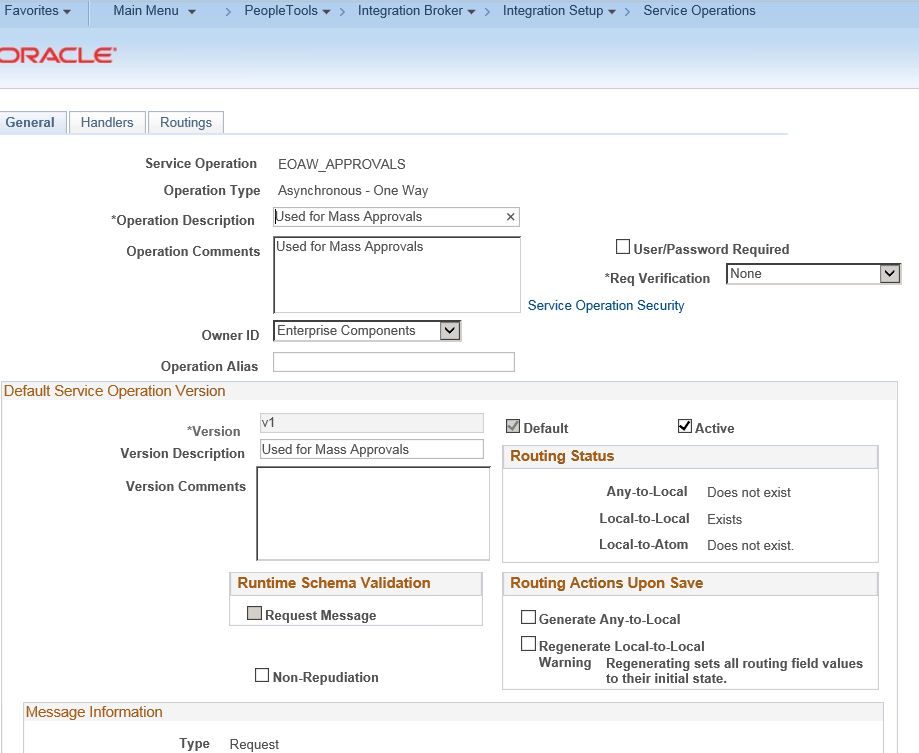
Under the Handlers tab, make sure the Handler is “Active”
6. Setup User Lists
Following User Lists were created to fetch the appropriate approval routings and Email notification routing. All the User lists use SQL Definitions which will be migrated through the Application Designer Project.
- CU_WF_Procurement –Created for routing final requisition approval email notification to the Procurement Department Distribution List
- CU_WF_LEVEL1 – This user lists identifies the appropriate candidates for Level 1 of Approval Cycle: Department and Project Admins
- CU_WF_LEVEL2 – This user lists identifies the appropriate candidates for Level 2 of Approval Cycle: OIT Managers
- CU_WF_LEVEL3 – This user lists identifies the appropriate candidates for Level 3 of Approval Cycle: Title 3 Managers
7. Setup security:
Permission List
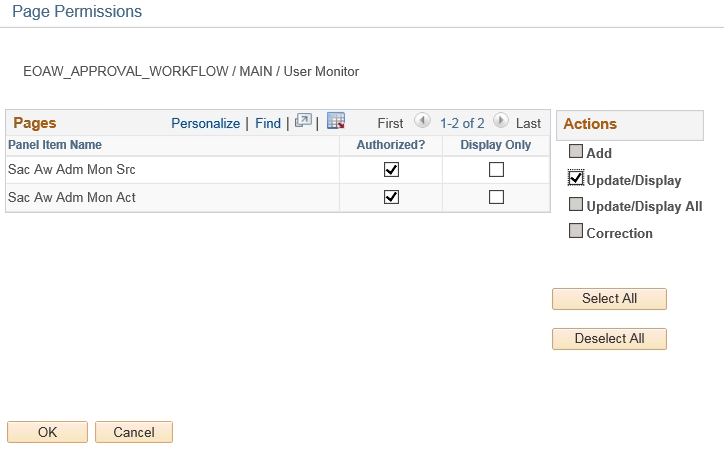
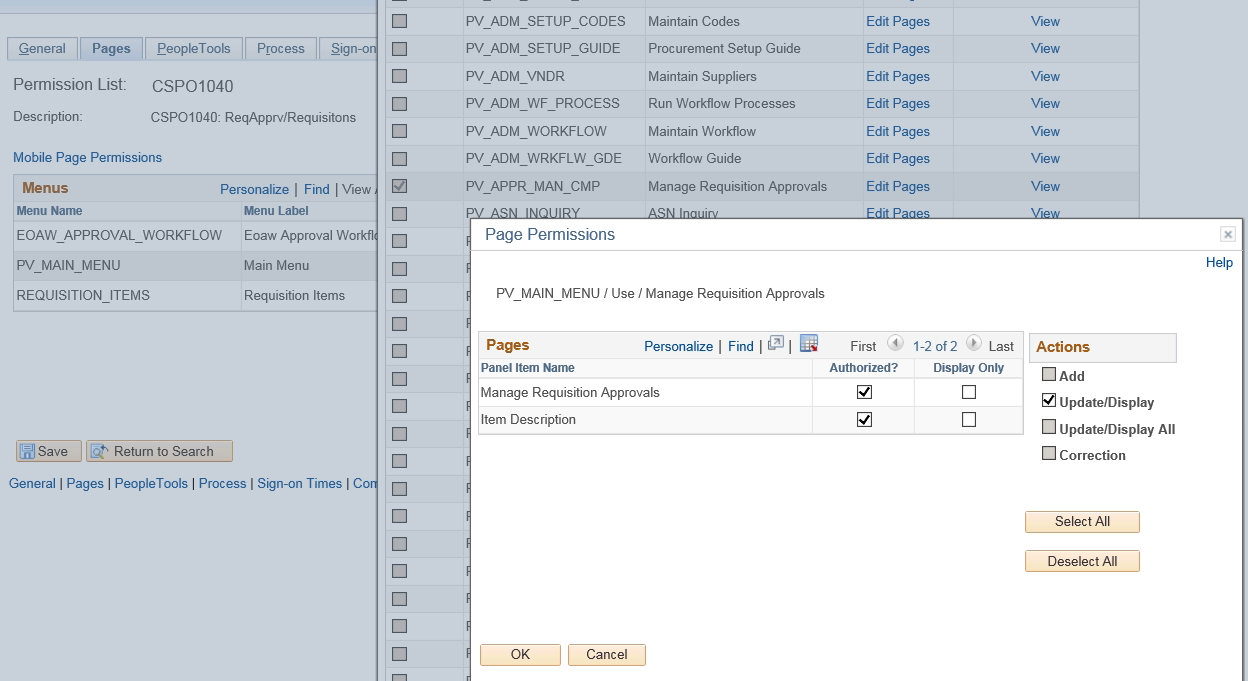
The Permission List CUPO1040 was edited and two more Menus were added for Requisition Approvers.
1. EOAW_APPROVAL_WORKFLOW
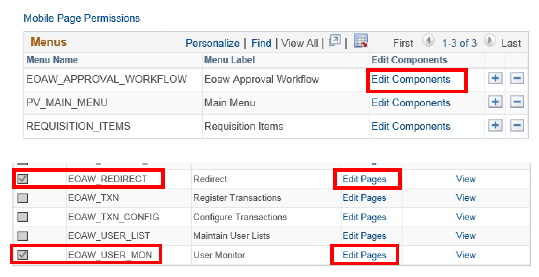
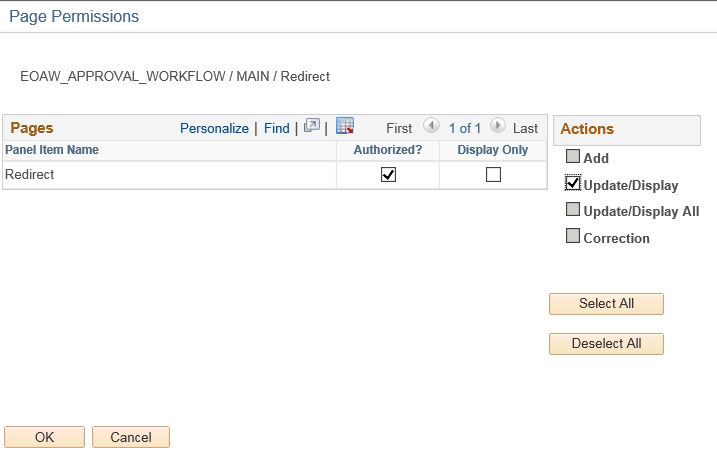
PV_MAIN_MENU
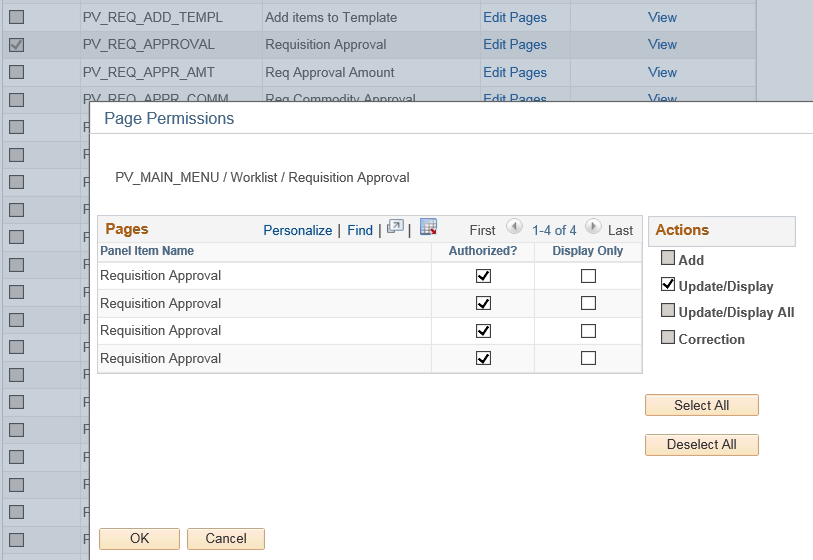
Two components were enabled under this menu – PV_APPR_MAN_CMP and PV_REQ_APPROVAL
These pages are required for the approvers to be able to approve requisitions.
A new custom role has been created for Workflow Admin and has been assigned to the “wrkflw_admin” user id as well. Role Name – CU_WF_ADMIN
See The Team In Action
Upcoming Events
-1.png)
Reach Out
Ready to Connect?
Please fill the following form, we will get back to you within a business day.
Contact Form
Contact Us